Well, as I begin to finish off the rooms with curtains, it also means I'm nearing the end of this dollhouse project. So, thus explains the above headline.
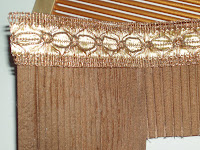
Here is a picture of the curtains in progress for the parlor in Sara's dollhouse. For those of you who are familiar with that project, it's a Victorian house with a two-story bay window on the left side of the house. The angles of the two corners of the bay are approximately 60 degrees.
Above the windows in this room is crown molding that comes down almost to the tops of the window trim. I considered for a while whether or not I should "hang" my drapes from curtain rods in this tight space. I decided that doing so would not gain me much of anything. So, I cut out a piece of half-inch plywood. (You can see it on the top, right-hand side of the photo.) The plywood projects out about 3/8" from the wall - about the same distance that the drapes would have been held away from the wall had I used a curtain rod to hold them. To secure the drapes to the wood, I used an aggressive fabric glue (FABRI-TAC), which dries very quickly. It's also acid free, which is important to me. (I want my creations to last for a generation or two yet to come.)
I found a one-inch wide ribbon that I think makes an attractive valance for the top. On my computer screen this valance comes off looking more green than gold. In real life, it appears more gold than green. Who knows what it looks like on YOUR computer monitor!
In the photo at left, you can barely see a little bit of the pleating device I used to make my curtains. It was built by Anker Rasmussen back in the 70's and is solid brass. I like using it, because after I push the cloth down into the gap between the brass pipes, I can inserts pins into a styrofoam backing to hold it in place. I can then spray the curtains with fabric stiffener to "lock in" the pleats.
Once I had the pleats, then I took grosgraine ribbon and trimmed off one edge and pulled the long threads from the ribbon to create a delicate fringe. I next glued that fringe in place along the bottom of the curtain.
I added tiebacks after I had formed the pleats and I had removed the fabric from the metal frame.  I used another kind of ribbon to create the tiebacks for the curtains on the sides. (It's a delicate, diaphanous ribbon.) I pinned the curtains to the styrofoam block and then gently worked the curtains back to a point where I liked the shape and then glued the tieback into place. Next, I glued the curtains to the plywood form mentioned (and shown) above.
 I used another kind of ribbon to create the tiebacks for the curtains on the sides. (It's a delicate, diaphanous ribbon.) I pinned the curtains to the styrofoam block and then gently worked the curtains back to a point where I liked the shape and then glued the tieback into place. Next, I glued the curtains to the plywood form mentioned (and shown) above.
 Below is a photo of the drapes trial-placed in the parlor. I haven't put them in permanently yet, because there's still some work I need to do with the drape on the right. It's not hanging quite right, and I'm going to have to do some work on it. So, it's still not quite curtains for this dollhouse project, but we're getting to the point where I think I can see the end not too far down the road!


4 comments:
George, One thing that will make your curtains hang straighter is to put a thin strip of wood inside the outer pleat on the straight edge. Then put a bit of glue here and there between the bottom of the pleats. Thus you will lose the fan at the bottom. I hope that this helps. Give me a yell if you have any questions.
Thanks, Casey. That's great advice. I had used a piece of acid free drawing paper on the side edge. As much as I use wood for my projects, I should have thought to use it in this application, too, since it would certainly have stiffened my fabric more than the paper did.
Another trick that I learned from Judee Williamson years ago is to use clear bathtub caulking between the bottom pleats. It's the kind that smells like vinegar. It doesn't penetrate the fabric and you can form the pleats less close together than with white glue. Experiment on a scrap first. Good Luck.
This exchange is EXACTLY why I enjoy blogging about miniatures. I get as much as I give. It's so much fun (and helpful!) to have other miniaturists share their tips and knowledge with me. Thanks again, Casey, for your contributions to this blog!
Geo.
Post a Comment