Sorry about my absence, friends. It’s been an incredibly busy summer and start of school. Plus, I’ve had a bout of writer’s block! The full-scale projects for my daughters are coming along nicely, though. The deck is nearing completion at my one daughter's house as is the bathroom/walk-in closet at the other daughter's home. So, now I can begin to think small again...
Today I'm going to discuss how to use the Dremel router table. I use my Dremel tool and various router bits to make an endless array of moldings for my miniatures, including baseboards. One of the frustrations that I have encountered when running long, thin pieces of wood across the router is that sometimes I press down too hard or too lightly as the wood goes over and past the router blade. As a result, I can get cupping or little dips or waves in what should be one continuous indentation the length of the wood strip.
Through trial and error, I have developed the following approach to help reduce this problem. Here are the steps I take to get better routing performance:
Step 1: Take a piece of wood that is at least 1/8" thicker than the piece of wood you plan to route. It doesn't need to be particularly wide. As you can see by my example, it can be a little over an inch wide and about four to six inches in length. I prefer to cut this piece of wood at a slight angle, as shown in the picture at left. This will become your "hold-down" piece that will help you keep a more even pressure on the routed board as it goes past the router bit.
Step 2: After you have cut your hold-down piece, lower your blade until it is at the same height or slightly lower than the thickness of the piece of wood that you will be routing (see picture at right). If you click on the photo to enlarge it, you'll notice that the blade is as much as 1/32" lower than the top edge of the wood strip that I will route. For this step, always make sure the blade does not extend above the piece of stripwood.

Step 3: Take your hold-down board and make a number of passes across your table saw blade so that you slowly nibble away the wood. You can see in the example at left, as the saw blade cuts through the bottom portion of the hold-down piece, it creates a shoulder on the hold-down board. Continue to cut your hold-down piece until the stripwood almost is the depth of the cuts. When you put the hold-down board on top of the stripwood, you should be able to see about 1/64" of the stripwood still protruding above the hold-down. (See picture below for example.)

Step 4: Install the router bit in your Dremel tool and adjust the height to the approximate height you want to route. (Tip: I always cut extra pieces of wood so that I can run some test cuts past the Dremel bit to make sure I have set the bit at the right height and that the adjustable guide fence is in the right position.) I often set the blade and the fence ever so slightly less than what I ultimately will rout the wood. If I'm removing a lot of wood from the stripwood, I will cut perhaps half of the amount of wood that I plan to remove with the first pass across the router.
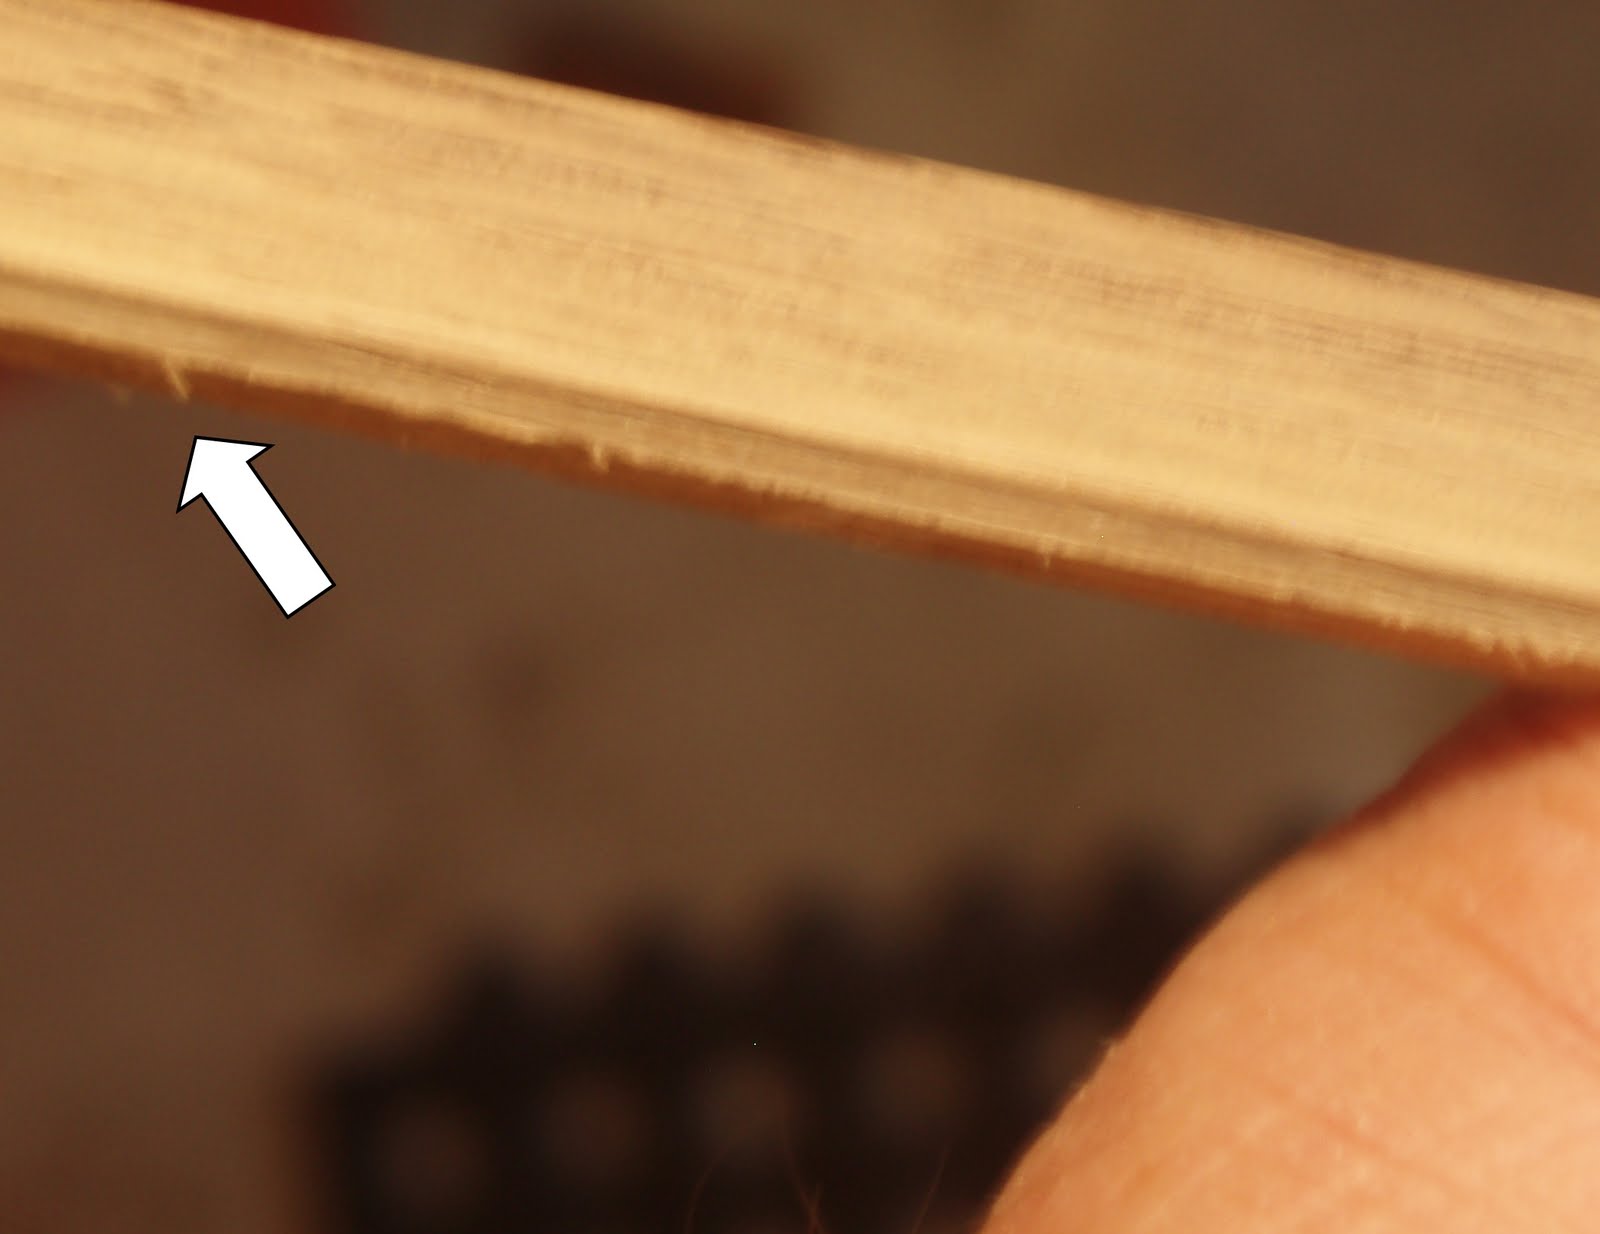
I do the rough cuts, running the wood past the bit a couple of times, then I sand the wood to remove burrs that pop up. See example photo below of wood with burrs on it. NOTE: If you attempt to rout too much of the wood at one time, the burrs can become large splinters, and no amount of sanding will correct for the gouge made in the wood from that large splintered spot. Take your time - make multiple passes, cutting a little at a time, and you'll be much happier with the final product!

Step 5: Take the hold-down piece of wood and set it over the piece of stripwood. Then push the stripwood against the adjustable fence and press down on top of the hold-down wood. The picture below shows how I start a piece of wood. Once the stripwood begins to engage the router bit cutting blades, I slide the hold-down to where it is centered over the cutting blade. Try to maintain consistent amount of pressure on the hold-down wood throughout the entire pass of the stripwood. When I get toward the end of the piece of wood, I often take a piece of scrap that is the same size as my stripwood and push the stripwood on through the router and past the hold-down area so that I cut the entire length of stripwood.

Step 6: Once you have run the stripwood past the router bit, adjust to the final height and depth, gently sand the stripwood with a fine sandpaper, and then do your final pass on the router. When making this final pass, you should cut only a minute amount of wood. This final pass should actually help sharpen the edges and lines of your routed wood. Also, because it is removing so little wood, there is less likelihood of your getting burrs on the edge of the wood.

As you can see above, here is an example of wood routed with a ball-shaped cutter. The piece of stripwood was not perfectly flat between the 4 3/4" and 5" mark. As a result, the cut is slightly (and I mean slightly!) less deep than the rest of the piece of wood. To help prevent this from happening, always make sure you start with a piece of wood that has a consistent width and depth to it. Sand it or run it through your table saw as needed to make sure you have a good piece of stripwood to work with. Remember, whatever your router bit shape is, the shape you cut into the wood will be the opposite. A ball-shaped cutter produces a rounded indentation in the wood (as illustrated above). A cup-shaped cutter will round off the edge of your wood.
Happy routing!