I have used a variety of ways to create miniature bricks in projects over the years. I have found one approach, though, that I like more than others. The end result can be quite realistic. I'm going to share directions with you for how to do it.
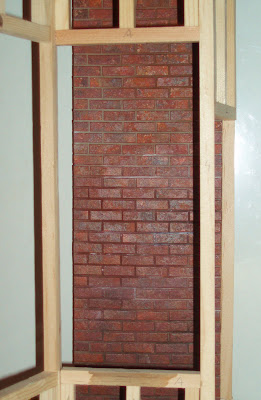
The picture on the left is the wall outside of the barbershop we're making in miniature club. It's my finished piece, and I made a mistake with it in the finishing process, but fortunately, it didn't ruin my wall. I'll tell you what I did and how I fixed it toward the end of this blog.
So, let's get started, shall we? I used white, acid free matte board to make the bricks. Whenever I use cardboard or paper in my buildings, I strive to make sure I'm using acid free paper. Card board, card stock or paper that isn't acid free tends to yellow and degrade over time.
I would like to think that a hundred years from now others will look at my miniatures and enjoy them as much as my friends and family do today. By using acid free papers, I come closer to assuring myself that they will.
Step 1: If you are using framed walls (like the ones you see in the above picture) rather than solid plywood or a foam core product , you must cut out two pieces of matte board. One piece has to be the exact the dimensions and angles of the wall(s) you plan to cover with bricks. The second piece should be about an inch wider and taller than the first. The larger piece will become your bricks.
There are two reasons I say make it larger. First, by doing this, you will make more bricks than you need to cover the wall. The last thing you want is to run short on bricks near the end of your brick laying. The second other reason is so that you have more to choose from. After I cut out my bricks, I didn't like how some of them looked. By over-producing them, you can be choosy.
Step 2: If you wish, you may paint the first piece of matte board to look like mortar. You can skip putting mortar in between the bricks, then, if you do this. (I prefer to fill the gaps between the bricks with mortar.) One of our club members chose to skip mortaring her bricks, and with the wall painted behind her bricks, I have to admit it looked pretty good.
If you choose to let the paint be your mortar, don't paint all of the surface with a solid color. If you study a brick wall, you'll notice that portions of the mortar whiten with age. Other parts actually get darker with dirt and oils splashed up on them.
Choose a light gray color of paint. Rather than painting in long strokes, take a sponge paint brush, get some paint on it, and then dab the matte board with the paint. You'll see little flecks of white appear that didn't get painted. Don't try to paint over them. Once that coat dries, take a darker color such as Payne's Grey and mix that with your original gray paint. dry brush over the first coat with this same dabbing technique. Be sure to make the color gradation get darker as you get nearer to the ground level.
Step 3: Now you can begin to paint your bricks. Before you begin, take time to look at various brick walls. You'll notice that the bricks are rarely a solid color. There are many colors - rusts, hints of ocher, browns, reds, yellows, touches of black, and, yes, even white! You can use the sponge paint brush again to create the bricks. If you're using the latex hobby paints that come in small bottles (2 oz./60ml), you can squeeze some out onto wax paper, dab your sponge into it and then tap around on the paper with the paint.
Don't try to paint with strokes.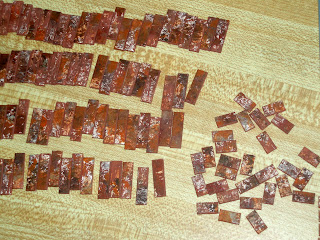
Linda from our miniature club painted my bricks for me while I helped others with their room boxes. As you can see from this picture of the resulting bricks, she created a variety of color and shades with her painting.
The colors we used for the bricks were Brown Iron Oxide, Georgia Clay, Heritage Brick, Burnt Orange and a
very dry brush application of lamp black dabbed on with a paint brush (not the sponge brush). You can see from the picture how mottled the bricks looked.
 Step 4: Once the paint has dried, you can then cut out the bricks. Cut the matte board in long, 7/32" wide strips. I use a rotary cutter for cutting the matte board. It's much easier to cut the matte with this tool than an X-acto knife. Take your time in setting up the cuts for these strips. Don't just measure once - measure at each end at least twice to make sure your rule is set for a consistent cut. (Using a ruler with a cork backing on it, will prevent it from slipping on the paper once it's it place.)
 If you have a tool such as "the chopper" where you can set up a stop, you can cut your bricks very quickly and consistently. It's very important that you cut the bricks a consistent length! Other-
wise, you'll end up with a very odd looking brick wall. Also, remember to cut some half-bricks for the end of a row.
Step 5: Buy a felt tip art marker with a gray or dark gray color (I got one at Michael's). You'll need to color all four sides of each and every one of the bricks that you plan to use. This hides the solid white edges of your bricks. When they are laid down on the already painted matte board, they look quite real. (See photo below.)
 Step 6:
At this point, you are now ready to begin laying bricks. Start with your bottom row of bricks and glue them in place with a good craft glue. I created a spacer that was about 1/2" thick in scale (3/64" or .041") I made sure to space the bricks by that thickness as I glued each in place. Remember to start each alternate row with a half brick so that the bricks are correctly aligned.
Continue laying bricks until you have completed the wall. At this point, you could stop. (As you can see from the photo, it looked pretty good at that point.) Or you can add grout.
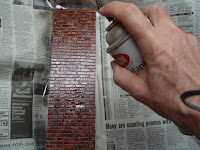
Step 7: Before you add any grout, you must first spray the bricks with a matte fixative. This makes your bricks somewhat water proof so that they don't absorb the paint from the "grout." The fixative dries quickly; so don't hesitate to put a couple coats on the bricks.
 Step 8:
 To add grout, pick up a small container of spackling compound - the stuff you sometimes use to repair small dents or holes in drywall. Take about a tablespoon full of the compound, and mix in some gray latex paint. (I added color to this compound until I was satisfied with the color.)
Then using a putty knife, scrape it across the bricks. Fill in small squares at a time - approximately 3" x 3" squares. As you see that you have filled all of the lines between the bricks, use a damp paper towel to wash away any excess of the grout that is still on the face of the bricks. (You only want it in the grout lines areas.)
To add some realism to your grout color, you can start with a lighter shade of grout and dab it into various places, then add some color to the grout to make it darker and dab in more in various places until it's all filled in.
Another way to add realism is to use dry powders model railroad enthusiasts use to give their models that perfect dirty and aged look. This is where I erred with my project. I used too much of it. You can wash it off, but in the places where I had white on my bricks, the aging dust obliterated all of the white. It also made my grout look a little like it was becoming brick colored, too. So, I went back over the grout with a small round file to scrape away some of the stained grout, thus restoring some of the grout to its original color.
And that, my friendly reader, is how I make my bricks. I think that if I need to have my bricks form real corners such as on a chimney, I will make those bricks the length of one full brick and a half brick. I'll then cut away most of the matte board behind the brick surface where the brick touches the corner. That way, I'll be able to fold the brick and there will be no line where I have joined two pieces of matte board together. That will be an exercise in patience, but anyone who takes on a project of "bricking" a wall in miniature is in for a test of their patience anyway!
 I did not purchase enough of the fabric to do both the bed and the curtains, and as a result, I had to find a different fabric for my curtains. I selected a beige, cotton cloth with a very tiny, subtle print to it. So, I'm happy with the fabric. Made up into a swag, I think it looks pretty nice.


